

In & Out Raglan Sweater Recipe
IN & OUT RAGLAN is a top down constructed sweater designed to be knit in most of the yarn gauges and can be customised to your own body measurements.
I believe the recipe is written in such a way that can be attempted even by the beginner knitter.
I called this sweater IN & OUT RAGLAN because, based on the table of stitch counts, the row where you find your cast on stitches will be your IN row (where you start the raglan increases) and the row where you find your body circumference number of stitches will be your OUT row (where you stop the raglan increases and split for the sleeves).
You are welcome to use this recipe when designing your own patterns, however in case of a published pattern, please make sure to give credit and link this page at the very beginning.
You can use the hashtag #inandoutraglansweater when posting your projects.
*Please read the whole recipe before start knitting*
NOTES ABOUT THE RECIPE:
You will need four of the same stitch markers, and one that is different (ideally one with a row counter) that will be used to mark the beginning of the round.
ABBREVIATIONS:
CO - cast on
BOR - beginning of the round stitch marker
PM - place plain stitch marker
SM - slip plain stitch marker
KFB - knit front and back
GSR - German short row
RAGLAN INCREASES
The increases are done in a 4 row pattern repeat as follows:
Row one: Increase both body and sleeves
Row two: Knit
Row three: Increase only body
Row four: Knit
If you have a preferred increase stitch, please feel free to use it, however in this recipe, I will be giving instructions for the one I use most often and that is knit front and back (KFB).
SHORT ROWS
If you have a preferred method of doing short rows, please feel free to use it. I prefer to use German short row (GSR) every 16th round until the splitting of the sleeves, and that is the instruction I will include in this recipe.
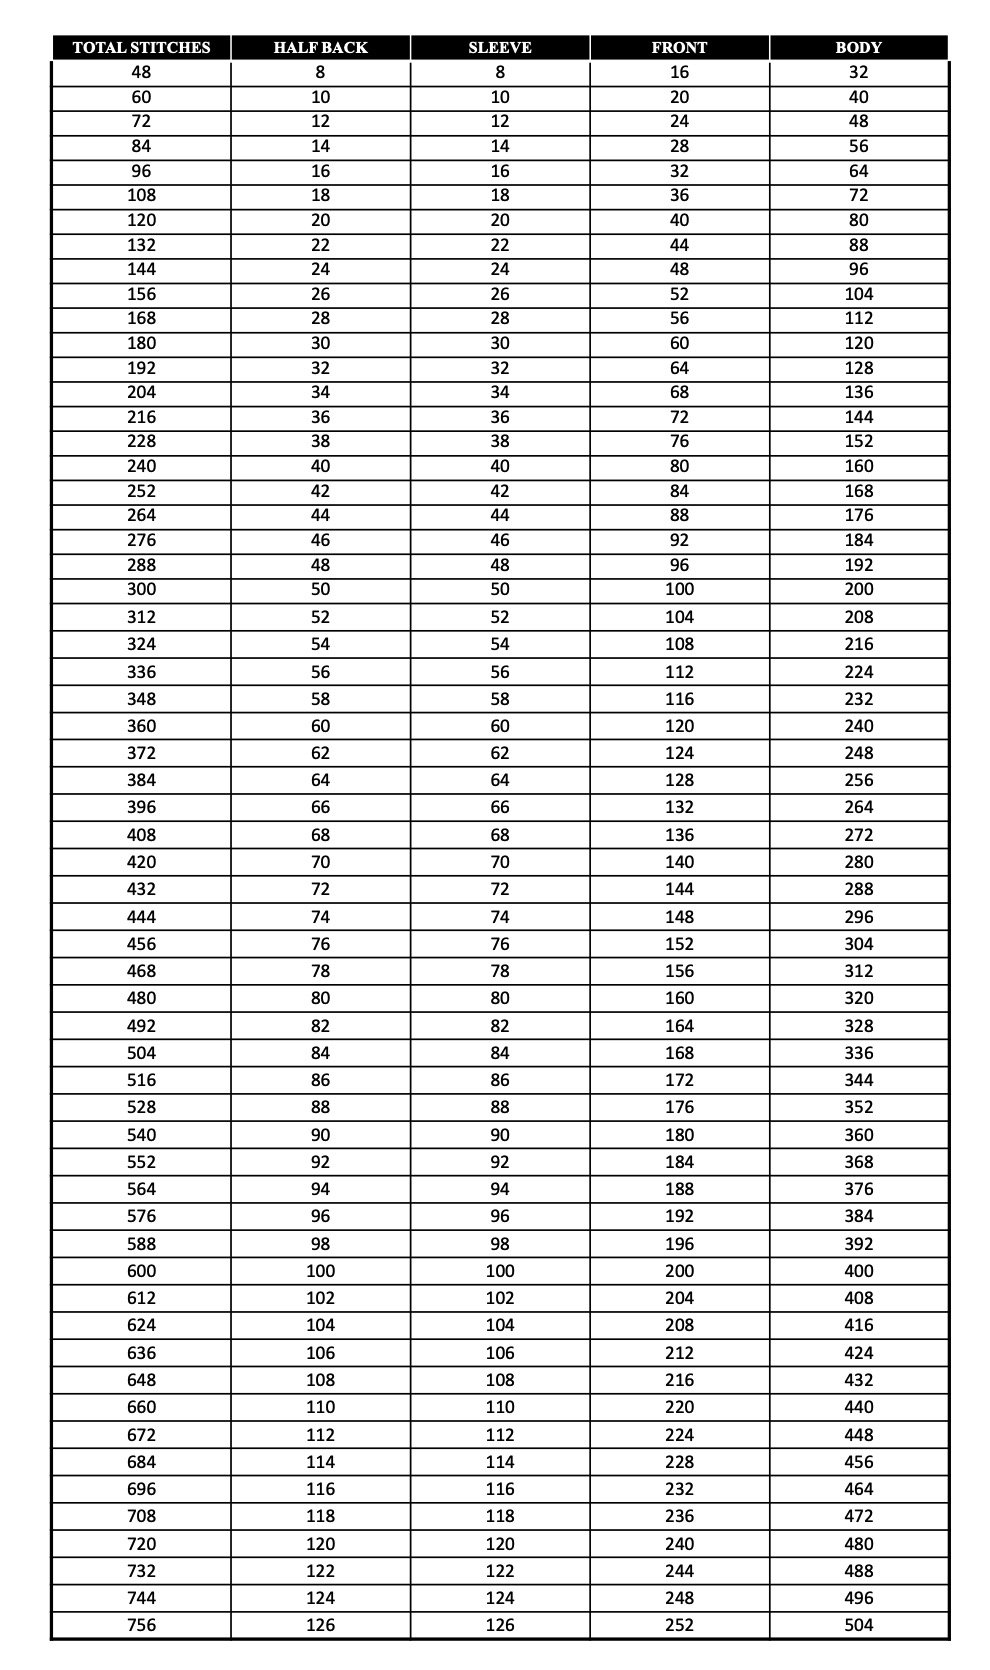
TABLE OF STITCH COUNTS
After taking your measurements and calculating your gauge, you will need to refer to the table provided for the stitch counts you will need.
Each row of the table will give you the exact number of stitches after each 4 row repeat of the increases.
Total Stitches - Total number of stitches you have on your needles. It can also be your cast on number.
Half Back - Since our beginning of the round is in the middle of the back, this column shows the number of stitches you will have between BOR and the sleeve.
Sleeve - Number of stitches on one sleeve.
Front - Number of stitches on the front of the sweater.
Body - Number of stitches (back and front) after splitting for the sleeves. This is the number you will use when deciding at what point you want to stop the raglan increases.

WHERE TO START?
START WITH THE SWATCH
Choose the yarn you would like to use.
Based on the recommended needle size for that yarn, and also knowing wether you are a tight or a loose knitter, choose the needles you are going to create the swatch with. I recommend that you choose a bit of a looser gauge because this sweater looks better when the fabric has some drape.
Knit a swatch in stockinette stitch that is minimum 15cm wide and tall. I recommend that you knit the swatch in the round without cutting the yarn, so the whole swatch is minimum 30cm in circumference. This is because it will give you a better representation of how the actual fabric will look like, and also there will be no wastage of the yarn as you can just unravel it in the end and use it for your sweater.
Soak your swatch in lukewarm water for about an hour and after getting rid of the excess water, lay flat to dry.
After the swatch has dried and you are happy with the fabric you have created, measure your gauge (how many stitches fit in 10cm horizontally).
GET YOUR MEASUREMENTS
NECKLINE Decide how wide you would like your neck opening to be. For example, if you would like to knit a turtleneck, measure the circumference around your neck, giving a bit of room so it is not too tight. If you would like a wider neckline (for example boat neck), measure the circumference of that size of the opening.
BODY Measure your chest circumference (on the widest part of your bust) but add any appropriate ease that you would like your finished garment to have. I recommend that you add about 15-20cm to your chest circumference but of course it is up to you.
SLEEVES The measurements for the sleeves are not as important because the sweater is designed that way that if you get the right measurements for the body (chest), sleeves are most likely to fit. However it is good to have this measurement as well, so go ahead and measure the circumference of the widest part of your arm (usually the biceps).
FINDING YOUR NUMBERS
Neckline
Now that you have the measurements of the neckline you want, you need to find which of the stitch numbers are for you.
Example: If the circumference of your neckline that you chose is 35cm and your gauge is 20 stitches per 10cm, you will need to multiply 20 (stitches) by 3.5, which will give you 70 stitches.
In the column that says “total stitches”, find the number that is closest to 70, and in this case it is 72.
That will be your cast on number and the IN row in the IN & OUT RAGLAN.
Body
Do the same for the body measurements but refer to the column that is titled “body”
Example: If you have decided that you want your body (after splitting for the sleeves) to be 120cm in circumference and your gauge is 20 stitches per 10cm, multiply 20 by 12 which will give you 240.
In the column that says “body”, find the number that is closest to 240 and that will be your OUT row in the IN & OUT RAGLAN.
Sleeves
Do the same calculation for the sleeves as you did for the neckline and the body.
Look in the same row where you have found your OUT stitch count for the body and find the column titled “sleeves”. The numbers should match your size, but since all of our bodies are different, it is best to check.
LET’S START KNITTING
CASTING ON
You can use your preferred cast on method, however I tend to use long tail cast on.
With the needle one size smaller than the needle you will be using for the body of the sweater, CO the number of stitches you have decided that you need for your neckline.
Place BOR and join in the round, being careful not to twist the stitches.
NECKLINE
In 1 by 1 twisted rib, knit how ever many centimetres you would like your neckline to be.
For turtlenecks, I like to knit 8-10cm and for wider necklines 5-6 cm.
*You can achieve the 1 by 1 twisted rib, simply by knitting the normal 1 by 1 rib but knitting the knit stitches through the back loop.
*For wider necklines, you could also cast on straight for the stockinette, pick up stitches later and knit the ribbing in the end. That will make the neckline stronger and less stretchy, but it will reduce the circumference of your initial measurements.
STITCH MARKER SET UP
Switch to the regular size of the needle you have done your swatch in.
After you have finished knitting the ribbing, knit one round in stockinette stitch while at the same time placing the plain stitch markers.
Refer to the row where your CO number is and place stitch markers as follows using those numbers:
Knit “half back” number of stitches, PM, knit “sleeve” number of stitches, PM, knit “front” number of stitches, PM, knit “sleeve” number of stitches, PM, knit “half back” number of stitches.
This should all add up to your “total stitches” that you have cast on.
Your BOR should be in the middle of the back of the sweater.
RAGLAN INCREASES
Row 1:
“Half Back” - knit until 2 stitches before the marker, KFB, knit 1, SM.
“Sleeve” - knit 1, KFB, knit until 2 stitches before the marker, KFB, knit 1, SM
“Body Front” - knit 1, KFB, knit until 2 stitches before the marker, KFB, knit 1, SM
“Sleeve” - knit 1, KFB, knit until 2 stitches before the marker, KFB, knit 1, SM
“Half Back” - knit 1, KFB, knit until the BOR
(8 stitches increased)
Row 2: Knit (no increases)
Row 3:
“Half Back” - knit until 2 stitches before the marker, KFB, knit 1, SM
“Sleeve” - knit (no increases)
“Body Front” - knit 1, KFB, knit until 2 stitches before the marker, KFB, knit 1, SM
“Sleeve” - knit (no increases)
“Half Back” - knit 1, KFB, knit until the BOR
(4 stitches increased)
Row 4: knit (no increases)
You are going to continue this 4 row repeat until you reach your OUT row in the table of stitch counts (the row where you have found how many stitches you need for the body and sleeve circumferences).
*From the cast on row in the table of stitch counts, each subsequent row will give you the new number of stitches you should have for each of the sections after every 4 row repeat. This will help you to check at any moment where you are and if you have the correct number of stitches for each section of the sweater.
SHORT ROWS:
If you choose to do the short rows the way I do, they are done every 16th round as follows:
Starting at the BOR, knit across “half back” until 3 stitches before the marker, GSR, purl across the whole back of the sweater to the other sleeve (BOR will be in the middle) until 3 stitches before the marker, GSR, knit until BOR.
Resolve all the GSR in the next round.
If you don’t know how to do GSR, I suggest you refer to one of the YouTube videos on how to do them as well as resolve them.
SPLITTING THE SLEEVES
As mentioned in the previous section, you will stop the raglan increases when you reach the row (in the table of stitch counts) where you have found how many stitches you need for your body and sleeves.
On that row, the “total stitches” should be the sum of 2x “sleeve” stitches plus “body” stitches.
*In case you feel your sleeves need a bit more room, go ahead and knit another 4 row repeat of the increases, or as needed. However, have in mind that this sweater is not designed to have wide sleeves.
*If your OUT row does not finish exactly on the GSR round, don’t worry about it and just go ahead and continue with splitting for the sleeves.
Start from BOR, knit across “half back” and remove the plain stitch marker. Place the sleeve stitches on scrap yarn or stitch holders (the number should match the number in the table of stitch counts) and remove the second plain stitch marker.
Knit across the “body front” and remove the third plain stitch marker.
Place the stitches of the second sleeve on scrap yarn or stitch holders
Remove the fourth plain stitch marker and knit to BOR
KNITTING THE BODY
Continuing in stockinette stitch, knit the body of the sweater until the desired length. Finish the body with around 6cm of twisted rib.
I don’t tend to change the needle size for the ribbing of the body as I like my sweaters to be straight, but that is up to you.
My preferred bind off is super stretchy bind off, but for this I will use a needle one size smaller than for the ribbing.
SLEEVES
After you have finished knitting the body, you can start knitting your sleeves.
Transfer the sleeve stitches that were on hold, onto the same size needle (smaller circumference) that you were knitting the body of the sweater on.
You will see that there is a gap between the two needles (right underneath the armpit), so in order to avoid the hole that can be created, we are going to create 6 extra stitches in that place.
Attaching a new yarn, pick up 3 stitches (passing your needle through two rows down of the body of the sweater), PM, pick up another 3 stitches and continue knitting.
Since now you are going to have 6 extra stitches than intended, decide whether you would like to continue with that stitch count, and if not, simply decrease 1 stitch every 5 rounds. You can do that by knitting 2 stitches together (I prefer to do that about 3 stitches before the the stitch marker).
That will look like like this:
Knit 4 rounds, and on the 5th round, knit until 3 stitches before the marker, knit two together, knit 1, slip marker.
After decreasing the 6 extra stitches we have created, I like to knit my sleeves straight, but if you like a more tapered look, you can continue decreasing until desired circumstance.
Knit the sleeve until the desired length (I suggest you try the sweater as your go) and finish it with around 6cm of twisted rib (the same as on the body).
Repeat the same with the second sleeve.
FINISHING
Weave in any loose ends.
Soak the garment like you did with your swatch.
Gently squeeze out any extra water (do not wring it).
Lay the sweater flat to dry.
Enjoy your custom IN & OUT RAGLAN
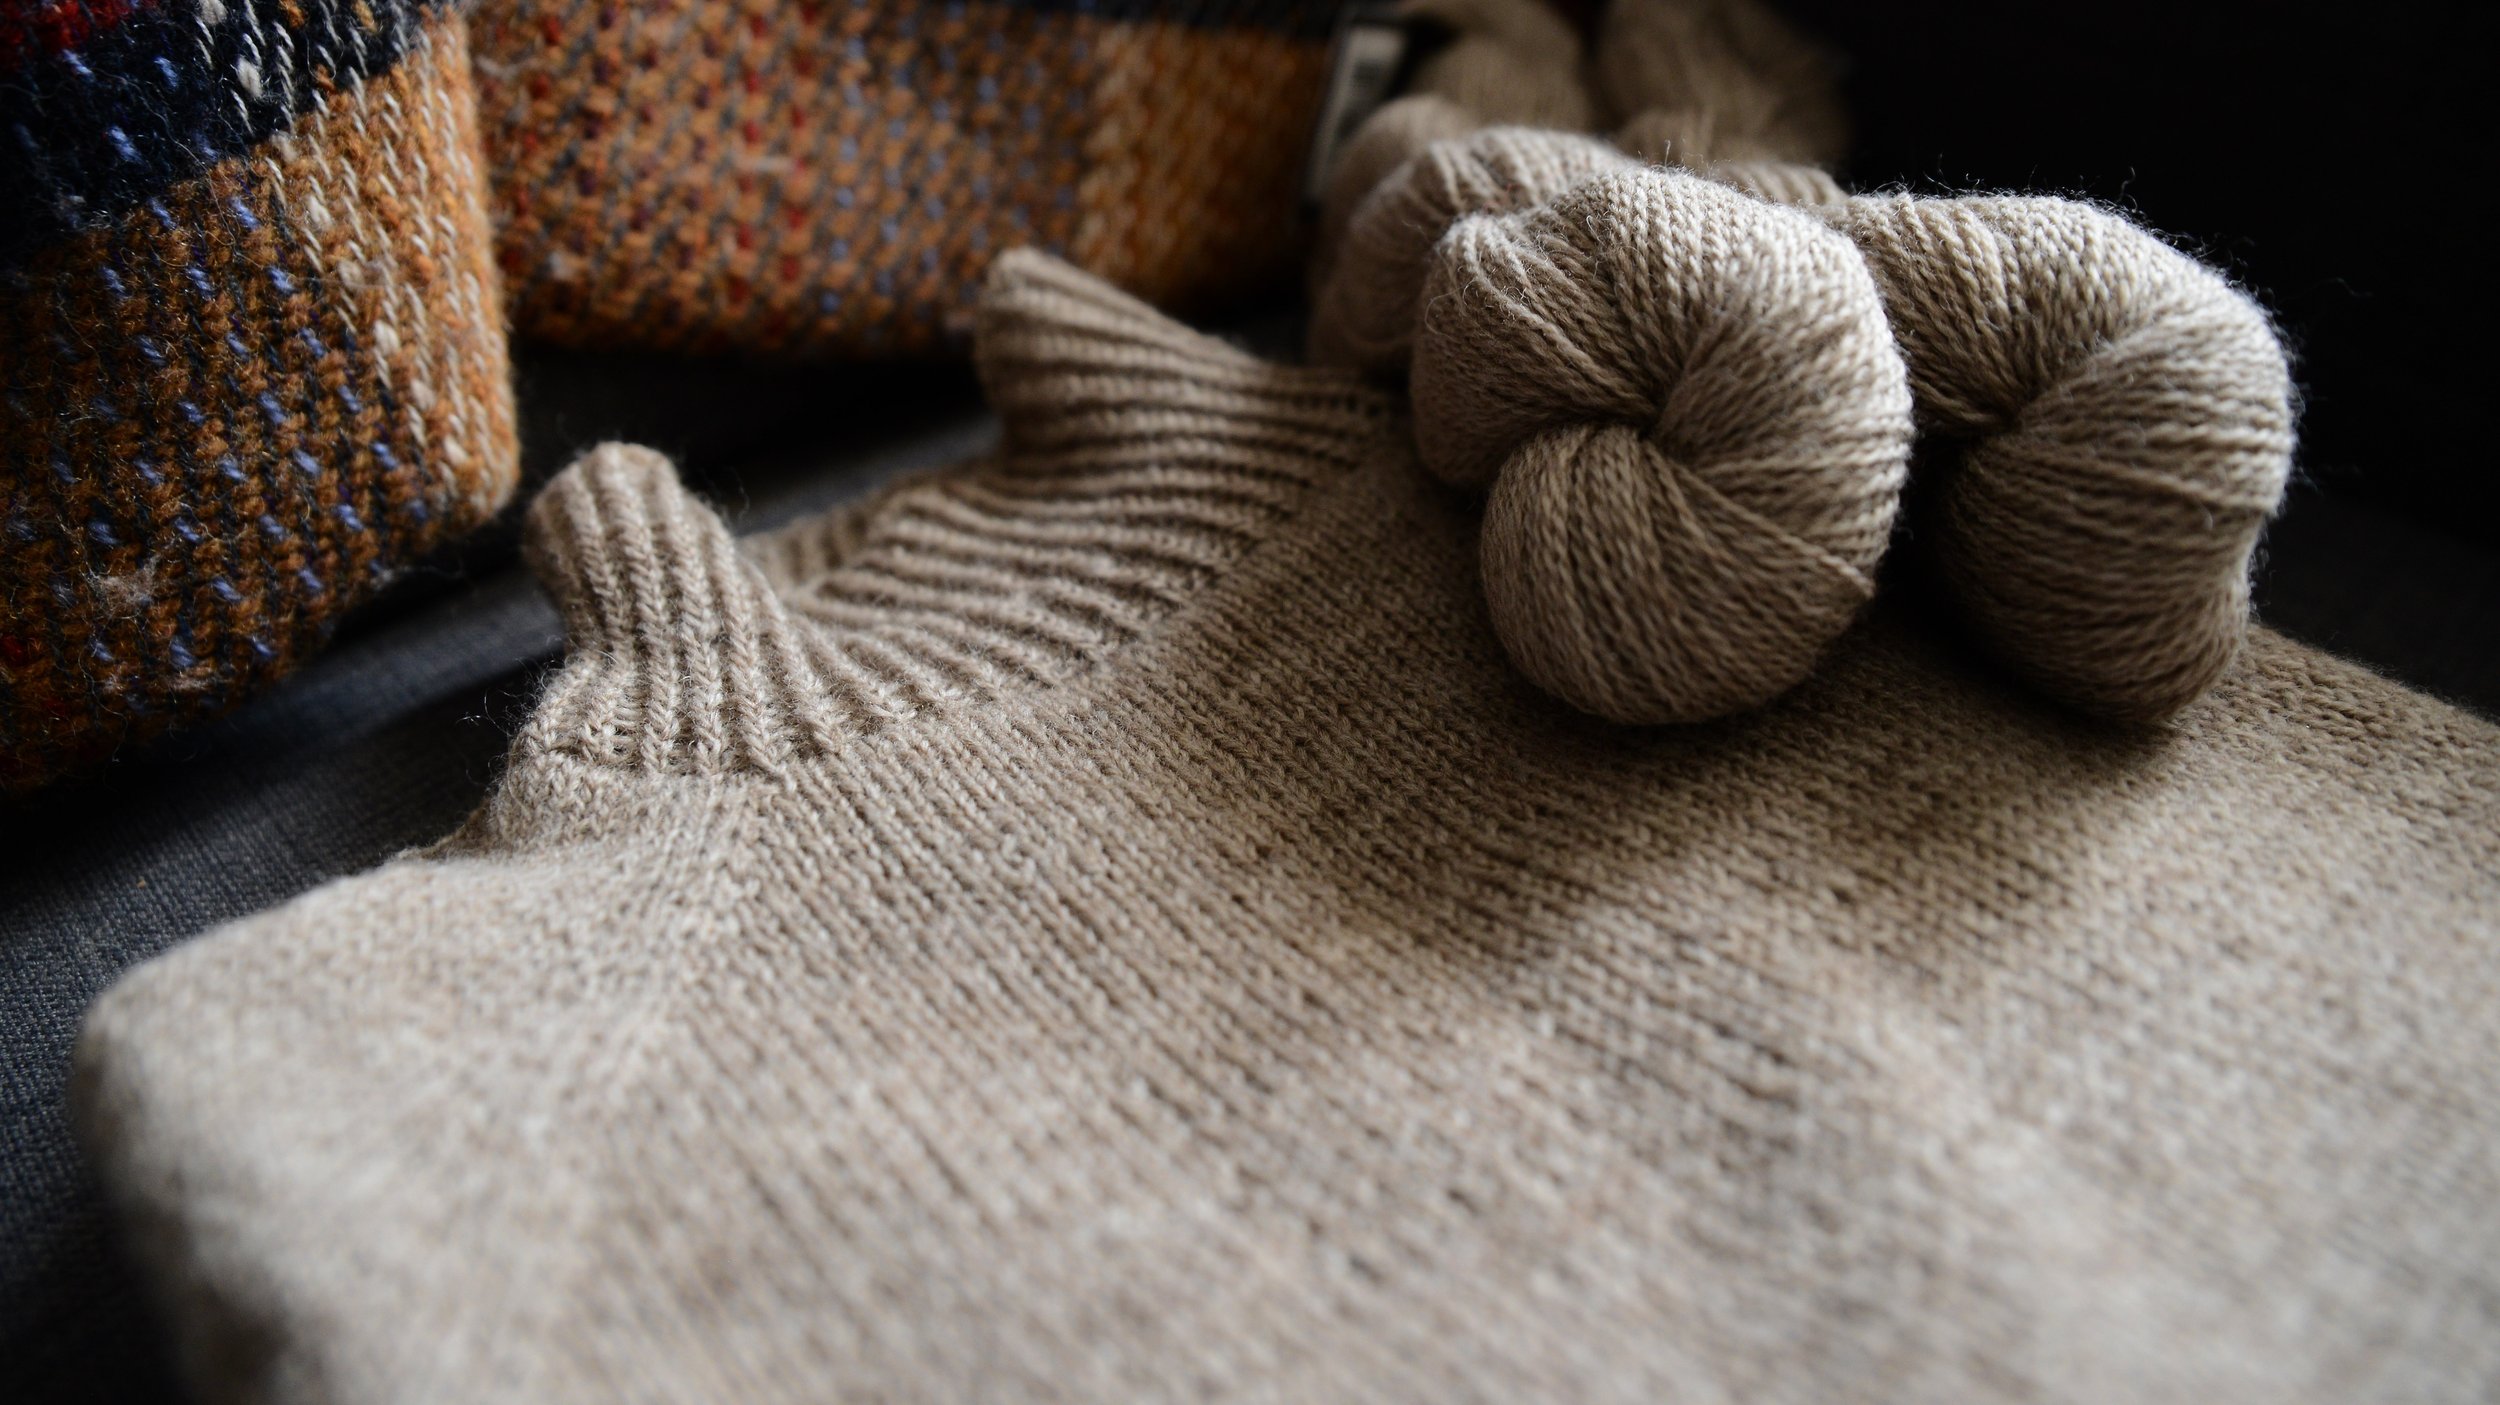
This particular sweater shown in this post has been knitted out of Cascade 220 fingering in colorway 8012 (Doeskin Heather) and you can see it this video on my YouTube channel.

Finished sweater and my Cascade 220 Fingering stash
Ivana


